How to Install a Sliding Patio Door Easily and Effectively?
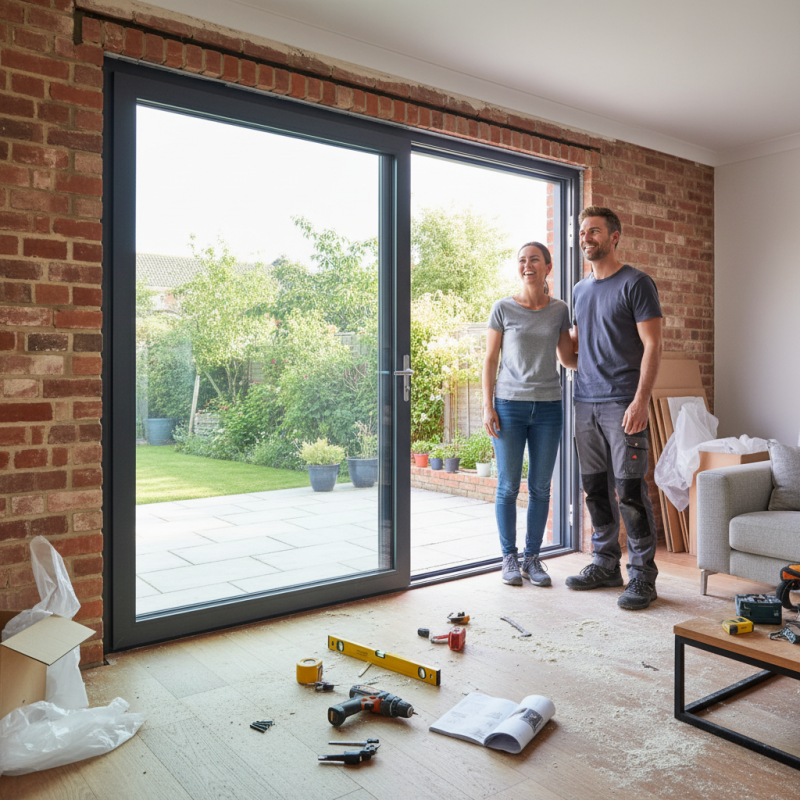
Installing a sliding patio door can transform your living space. This project not only enhances aesthetics but also improves functionality. Many homeowners may feel intimidated by the idea of sliding patio door installation. Yet, with the right approach, it can be quite manageable.
Choosing the right materials is crucial for the process. Measure your space accurately to ensure a perfect fit. You might encounter issues like uneven floors or wall discrepancies, which can complicate the installation. Preparation is key; take your time to gather tools and materials. Also, remember that you may need a helper for heavier sections of the door.
There will be moments of confusion during the installation. You might find the instructions unclear. Perhaps you’ll wish you had watched more tutorial videos. But with patience and effort, each step brings you closer to a successful installation. Ultimately, the satisfaction of completing a sliding patio door installation is worth the challenges faced.
Tools and Materials Required for Installing a Sliding Patio Door
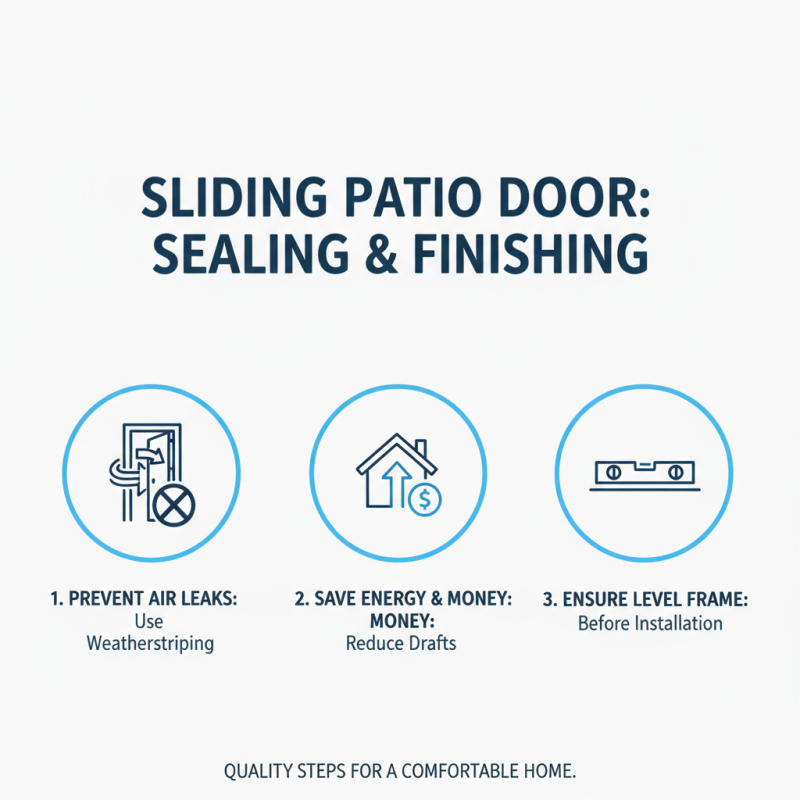
Installing a sliding patio door can be a rewarding project. To get started, you’ll need some essential tools and materials. A measuring tape will help ensure accuracy in your dimensions. A level is crucial for maintaining a straight alignment. You'll also need a drill, a saw, and a screw gun for assembly. Don't forget safety gear like gloves and goggles.
Materials are just as important. You’ll need a sliding patio door kit, which typically includes the door panels and track. Make sure you have adequate weather stripping to seal gaps after installation. Silicone caulk can also assist in preventing leaks. Keep screws and anchors handy for securing the framework.
While gathering supplies, consider the space where you will install the door. The area needs to be clear and accessible. Sometimes, unexpected issues can arise, like uneven floors or old framing that needs repair. Stay flexible and be ready to adapt your plan. A well-prepared workspace will help the installation go smoother. Don't rush the process; taking your time can prevent costly mistakes later on.
Measuring the Opening: Ensuring Accurate Dimensions for the Door
Measuring the opening for a sliding patio door is crucial. Accurate dimensions ensure a smooth installation process. Start by measuring the width and height of the opening. Use a tape measure to get precise readings. Don’t rush; double-check your numbers to avoid mistakes.
Consider measuring at different points. Sometimes walls aren't perfectly straight. Record several measurements. Note any variations. This will help you decide if adjustments are necessary. The goal is to create a snug fit for your new door, minimizing gaps.
If your opening has uneven surfaces, take time to address them. A level surface is essential for proper door function. You may need to add or remove material to achieve this. Imperfections can lead to complications later. Reflect on your measurements and adjustments. They play a vital role in the door's efficiency and longevity.
Preparing the Site: Steps to Remove an Existing Door Safely
Removing an existing door safely is crucial before installing a sliding patio door. According to industry reports, approximately 30% of DIY projects fail due to improper removal techniques. Start by using a screwdriver to take off the door handles. This ensures that you won't damage any surrounding materials during the process. Next, check for screws holding the door in place. Most doors have them at the hinges. Remove these screws carefully to prevent injury.
After disassembling the handles and screws, it's time to remove the door itself. Ask for help if the door is heavy or awkward. Doors often weigh around 100 pounds or more. Keep in mind that removing the frame might be necessary. This can be risky if not done carefully. Use a pry bar for this, but be gentle. Cracks can appear in the wall if too much force is applied. Consider hiring a professional if you feel uncertain.
Inspect the area once the door is out. Look for any damages that need repair, like mold or water leaks. About 20% of homeowners fail to check for these issues. Fixing them before installation can save money in the long run. Always wear safety gear, including gloves and goggles, to minimize risks during this process. Safety should be your priority.
Tools Required for Installing a Sliding Patio Door
Installing the Track and Frame: Techniques for a Secure Fit
When installing a sliding patio door, the track and frame play crucial roles. Proper alignment ensures smooth operation and durability. According to industry reports, incorrect track installation can lead to jams or premature wear. This makes the initial setup even more vital.
Start by measuring the area accurately. Ensure the frame dimensions match the door specifications. Many DIYers underestimate the need for precision in this step. An uneven surface can compromise the door’s function. Always double-check your measurements before proceeding. While it seems straightforward, it’s often a source of frustration.
Next, securely attach the track to a level surface. Use screws and anchors designed specifically for this purpose. Research indicates that nearly 30% of homeowners overlook this, resulting in unstable tracks. An insecure track could lead to safety hazards later. Choosing the right materials makes a difference. Yet, many find themselves using subpar options, which affects performance. Taking the time to select the right screws and anchors ensures a long-lasting installation.
How to Install a Sliding Patio Door Easily and Effectively? - Installing the Track and Frame: Techniques for a Secure Fit
| Step | Description | Tools Required | Estimated Time |
|---|---|---|---|
| 1 | Measure the opening space and choose a suitable sliding door. | Tape Measure, Level | 1 hour |
| 2 | Prepare the track area by clearing debris and ensuring level surface. | Vacuum, Level | 30 minutes |
| 3 | Install the track according to manufacturer instructions. | Drill, Screws | 1 hour |
| 4 | Fit the frame into the opening and align it with the track. | Screw Driver, Level | 1 hour |
| 5 | Secure the frame with screws, ensuring it is firmly attached. | Screw Driver | 30 minutes |
| 6 | Install the sliding door panels into the track. | None | 30 minutes |
Sealing and Finishing: Ensuring Efficiency and Energy Conservation
Sealing and finishing are crucial steps when installing a sliding patio door. Proper sealing ensures no air leaks, which helps save energy. Use high-quality weatherstripping to fill gaps around the door. This can prevent drafts and reduce heating costs. Ensure that the door frame is level before installation. An uneven frame can lead to sealing issues.
Don’t overlook the finishing touches after installation. Paint or stain the frame for protection against moisture. Apply a waterproof sealant around the edges for extra durability. Many overlook this step, but it can extend the door's life significantly. You might find you need to do this more than once.
Remember to check for any areas that might need attention later. Regular maintenance is necessary. You can sometimes miss small gaps that later turn into bigger issues. It’s worth taking a second look at your work. Just one mistake can compromise energy efficiency. Stay proactive to keep your sliding patio door performing well.
Related Posts
-
Essential Guide to Sliding Glass Door Replacement: Enhancing Your Home's Aesthetics and Security
-
The Ultimate Guide to Choosing the Right Sliding Glass Door Replacement for Your Home
-
Expert Guide to Sliding Glass Door Installation for Energy Efficiency in Your Home
-
Unlock Your Home’s Potential: A Comprehensive Guide to the Best Sliding Patio Doors for 2023
-
5 Essential Tips for Choosing the Perfect Patio Doors in Canada: Boosting Home Value by 10%!
-
Patio Door Replacement: Expert Insights and 2023 Trends for Optimal Home Value

